The Connection Wizard Builder Manager System is a module in Photoshop Replacer that automates the creation and management of connections between layers based on their names.
It enables quick project updates by matching new elements to existing layers and adjustment layers.
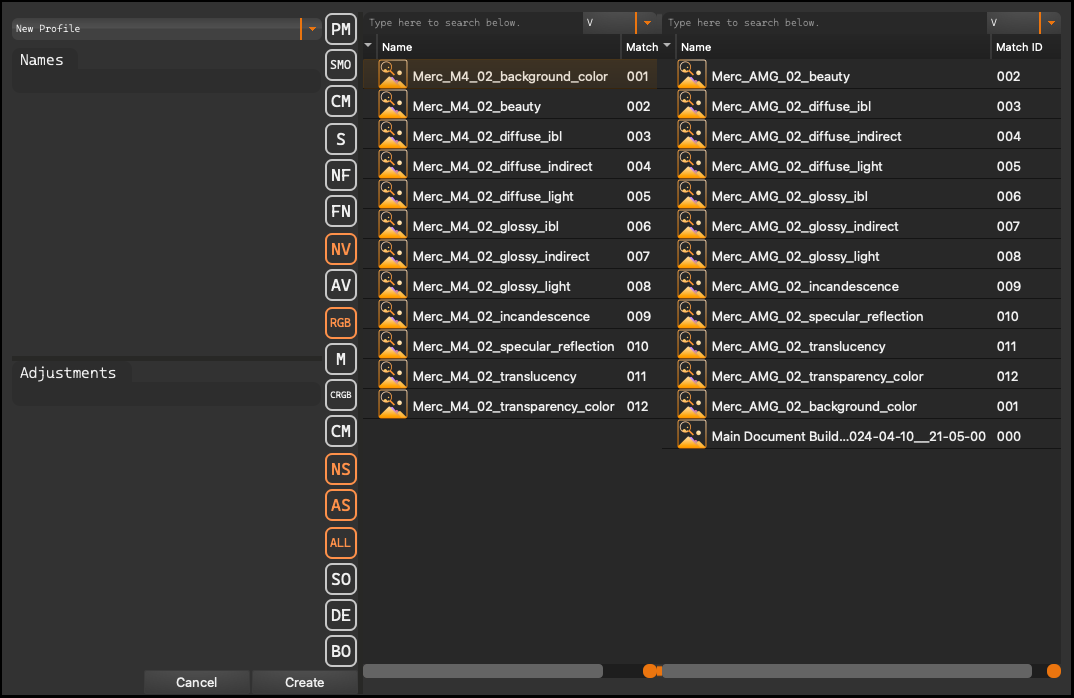
Main Shortcut#
-
PM - Clicking this button opens the Profile Manager dialog window, enabling profile management.
-
SMO - The “Show matched only” option displays only those results that have been matched.
-
CM - “Colorized Matched” assigns a unique color to each set of matched images.
-
S - The “flat tree” mode presents the hierarchy as a single tree without subordinate elements.
-
NF - “Hide Folders” hides folders in the view.
-
FN - “Folder Name” In simple mode, the folder name is displayed as a prefix to the image name, e.g., “Group/Another Group/SomeImage.jpg”.
-
NV - Changes the content displayed on the right side to results matched by name.
-
AV - Changes the content displayed on the right side to results matched by adjustments.
-
RGB, M, CRGB, CM, NS - Create connections between the source and the destination for matched images.
-
AS - Enabling this option creates adjustment layers and links them to a layer if the rules/tags match.
-
ALL - Creates connections/adjustments for both source and destination images.
-
SO - Creates connections only for selected images in the source view.
-
DE - Creates connections only for selected images in the destination view.
-
BO - Creates connections for selected images in both source and destination views, even if they are not matched; allows selecting different layers for the connection.
Profile Manager#
Profile Manager is a tool designed to create, manage, and apply matching profiles that automatically configure connections between new and existing layers in a project. Users can define rules based on layer names, allowing for precise and rapid project updates by automatically matching layers according to established criteria.
This functionality streamlines the project management process, enhancing efficiency and accuracy in the integration and updating of project elements.
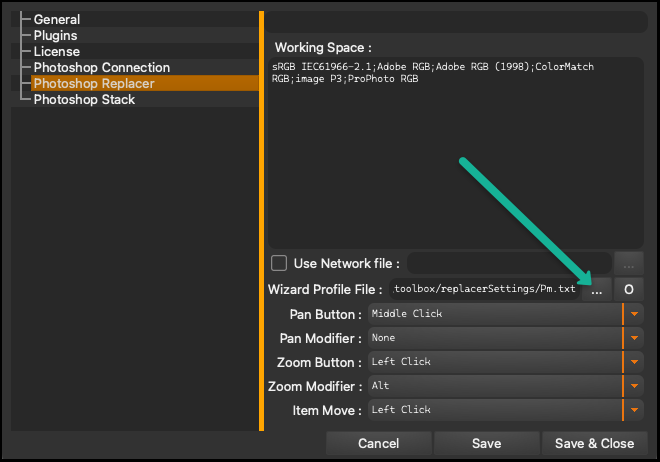
To start working with Profile Manager, it is first necessary to specify the profile location where all created rules will be stored:
-
Open Settings in the main window of Icarus Production Tools.
-
Go to the Photoshop Replacer tab.
-
Find the Wizard Profile File option.
-
Choose a location on your disk where you want to save the profile file.
-
Save the changes.
Specifying the profile location is essential for saving and applying rules in projects. Without this step, the full functionality of Profile Manager cannot be utilized.
Names#
Name: serves to automatically compare and match layers based on names, analyzing the differences between the left side (new renders or elements) and the right side (existing layers in the project).
This allows the user to precisely and automatically merge new elements with the corresponding layers in the project.
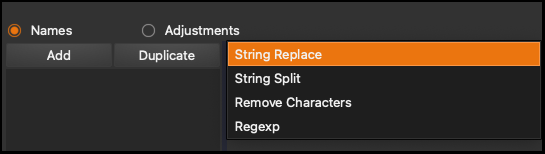
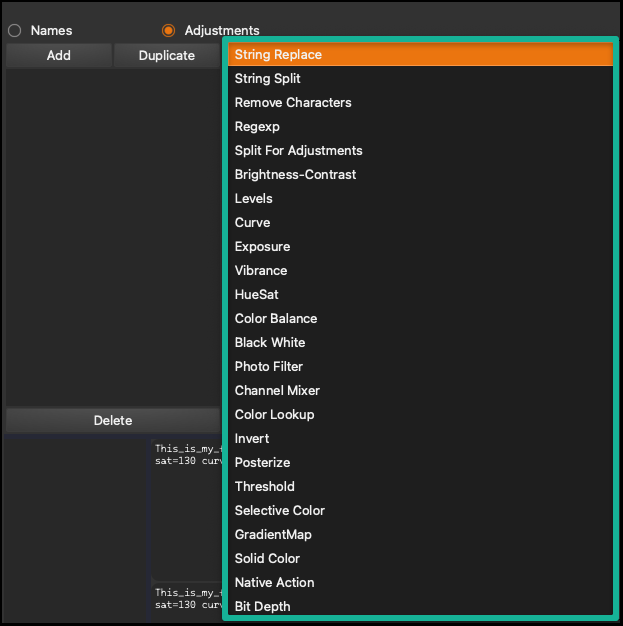
In Profile Manager, when creating new rules, users have access to four advanced options that allow for precise customization of how new layers are matched to existing ones in graphic projects.
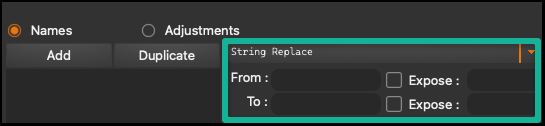
- String Replace: allows for the quick substitution of a specific fragment of a layer name with another, facilitating uniform naming changes throughout the project. The user inserts the part of the name to replace and the new string to insert in its place, ensuring name consistency.
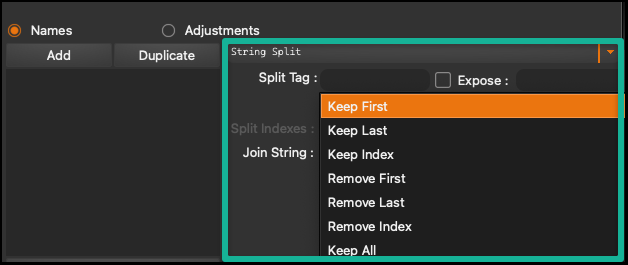
- String Split: divides layer names based on a selected separator, enabling efficient segregation and organization of project elements. This feature is key to extracting relevant information from complex layer names.
Within this option, there are additional options that offer users advanced tools for precise manipulation of the resulting name segments:
-
Keep First: retains the first segment of the name after splitting, allowing focus on the most important part of the identifier.
-
Keep Last: leaves the last segment after splitting, used when key information is at the end of the name.
-
Keep Index: enables keeping a segment at a specific index, giving the user control over selecting a specific part of the name.
-
Remove First: removes the first segment from the name, allowing for the elimination of unnecessary prefixes or identifiers.
-
Remove Last: eliminates the last segment of the name, useful when the final part does not add value to the layer identification.
-
Remove Index: allows for the removal of a segment at a specific index, offering flexibility in correcting specific parts of the name.
-
Keep All: preserves all segments after splitting, which is useful when the full preservation of the original name structure is needed.

- Remove Characters: eliminates unwanted characters from layer names, ensuring cleanliness and order in the project structure. Removing unnecessary characters simplifies management and avoids naming errors.
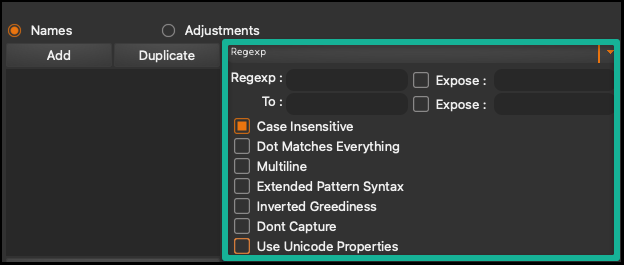
- Regexp: uses regular expressions for advanced searching and modifying layer names, offering a precise tool for complex text operations. This enables detailed matching and transformations of names, tailored to the specific needs of the project.
Thanks to a set of specialized selection buttons, users can tailor their search to very specific needs.
-
Case Insensitive: This option allows ignoring the differences between uppercase and lowercase letters during searches, providing greater flexibility in pattern matching.
-
Dot Matches Everything: When this option is enabled, the dot symbol “.” in a regular expression matches any character, including newline characters, allowing for more universal matches.
-
Multiline: Treats each line of text as a separate string, which is particularly useful when processing multiline layer names or descriptions.
-
Extended Pattern Syntax: This option allows for the use of more complex and readable patterns in regular expressions, ignoring whitespace and allowing for comments.
-
Inverted Greediness: Changes the default behavior of quantifiers (such as “*” and “+”), making them non-greedy by default until greediness is explicitly specified.
-
Dont Capture: Prevents capturing matched groups for later use, which can be useful when only the fact of matching is of interest, not the matched values themselves.
-
Use Unicode Properties: Enables the use of Unicode character properties in regular expressions, allowing for more precise and varied matches based on character categories, such as letters, digits, punctuation.
Adjustments#
Adjustments: provides the ability to define how adjustments (e.g., color corrections, exposure) are to be applied during the layer update process. This enables automatic application of specific corrections to new layers while preserving the intended visual effects of the project without the need for manual editing of each layer.
Creating a New Profile#
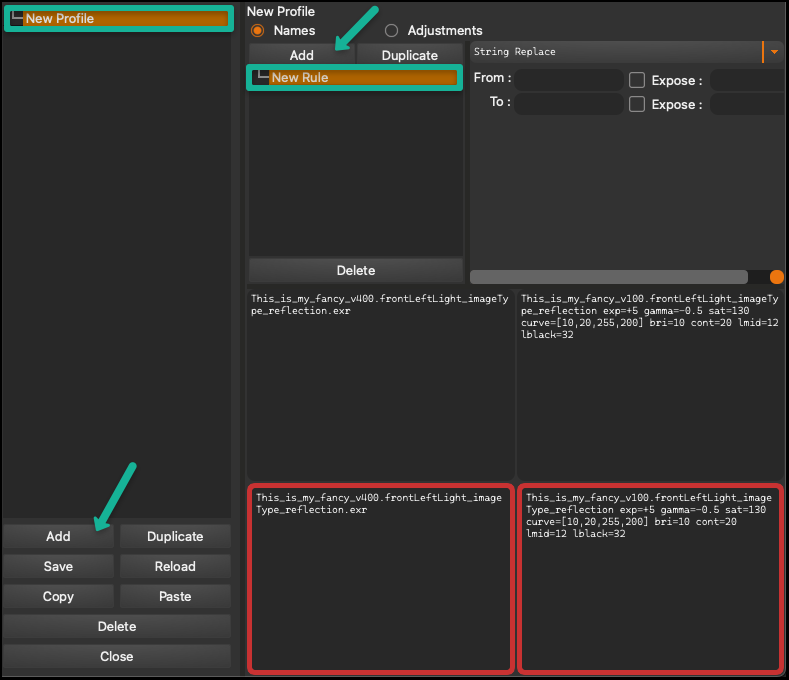
Creating a New Profile:
-
To begin, locate and click the “Add” button at the bottom left of the larger dialog window.
-
After clicking, you will have the option to name the new profile. Choose a name that best reflects the nature of the project or the specifics of the tasks for which the profile will be used.
Adding Rules to the Profile:
-
After successfully creating the profile, proceed to add rules that will guide the process of matching layers. Click the “Add” button located in the smaller dialog window.
-
Each rule defines specific criteria and conditions for matching new elements to existing layers.
Remember that you should first create a profile, and only then define rules. This makes the project management process more organized and easier to control.
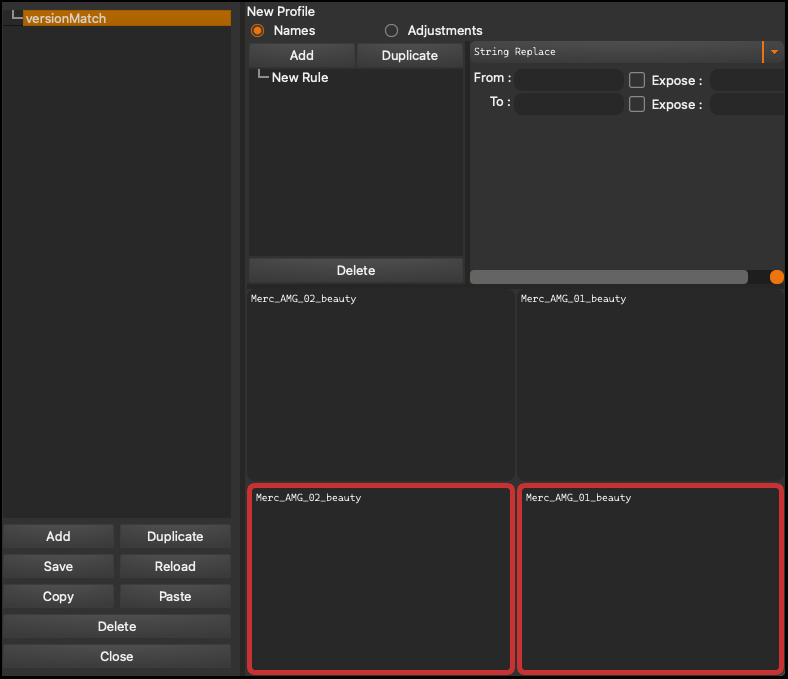
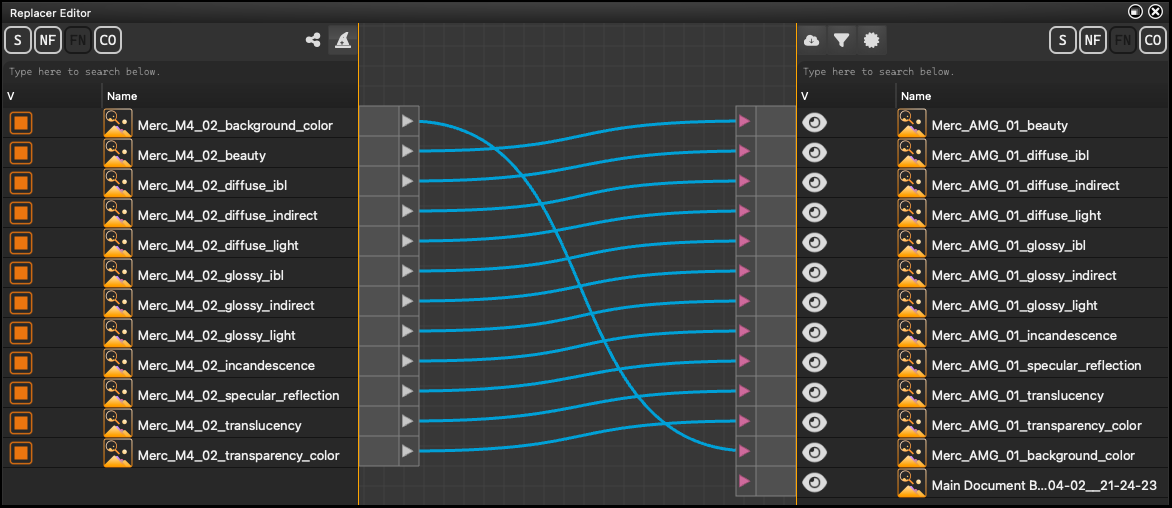
Matching Process#
Matching Process:
-
In the right box, the name of an element from an existing Photoshop project is displayed. This could be, for example, a currently used layer or an already existing project component.
-
In the left box, there is the name of a new file that is to be used for replacement. This could be a new render, an updated element, or an improved version of a component.
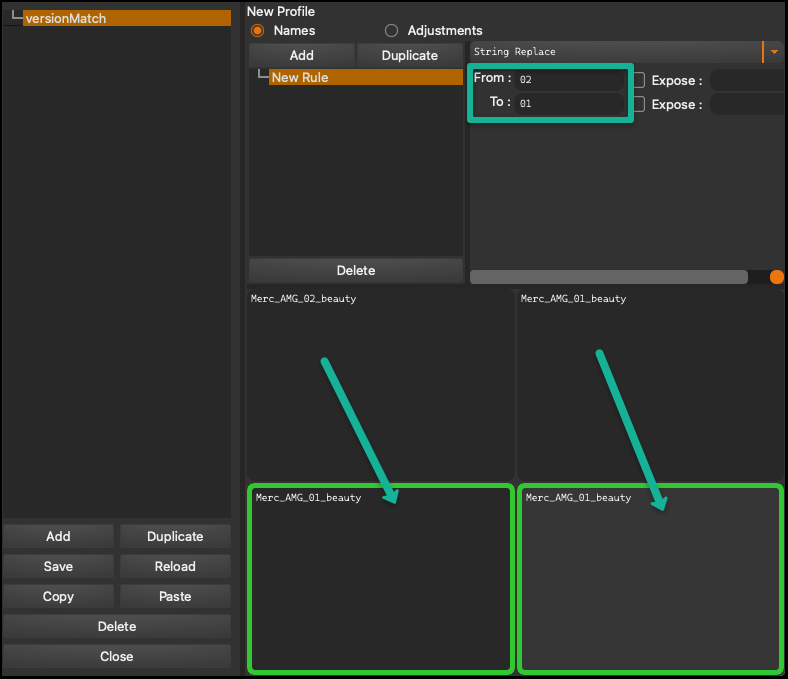
Setting Rules:
-
To achieve name consistency and trigger the change of visual indicators to green, rules must be defined in the “From” - “To” section.
-
The user must specify which part of the name in the right box they want to replace (From) and what exactly it should be replaced with (To) in the name found in the left box.
Effects of Applying Rules:
Properly setting the rules will enable the system to automatically process and compare names, aligning new elements with existing layers according to the established criteria. Successful matching will change the color of the visual indicators from red to green, signaling the correct assignment of new files to project elements.
Expose#
The Expose function allows users to access and modify individual components of rules within the Profile Manager. This enables quick adjustment of layer name matching parameters without the need to redesign the entire profile. This functionality allows for efficient adaptation to current project requirements, minimizing the need for time-consuming changes and reconfigurations.
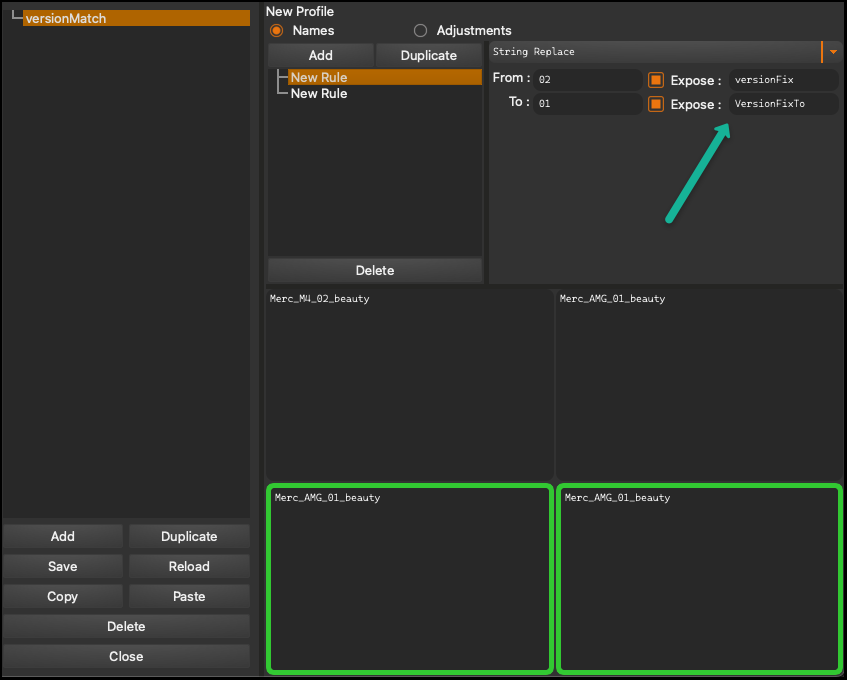
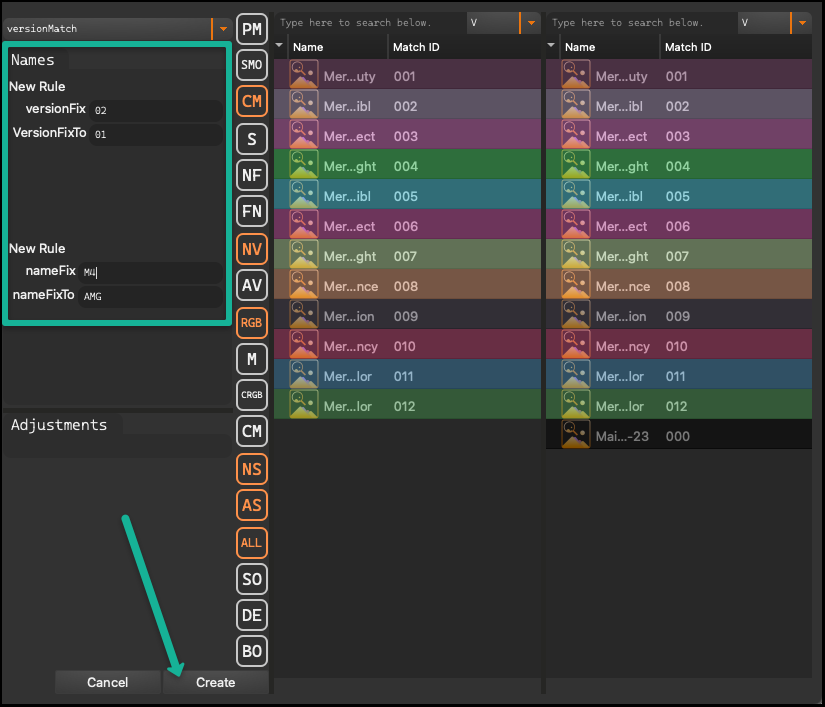
Colors on the user interface act as a direct indicator of layer matching. Each match is identified by a unique number known as the Match ID. These identifiers are displayed next to the names of the associated layers, allowing users to quickly verify results without the need for in-depth analysis of details. The essence of the process is to match the left side of the interface to the right. Since the names on the left side can differ, it is necessary to dynamically adjust the names to make them similar to those on the right side.
Additionally, when the Match ID displays the number 0, it indicates that there is no connection between the associated layers.
After completing the rule creation, clicking the Create button displays all configured connections, allowing users to review and verify the matches they have created.