Document#
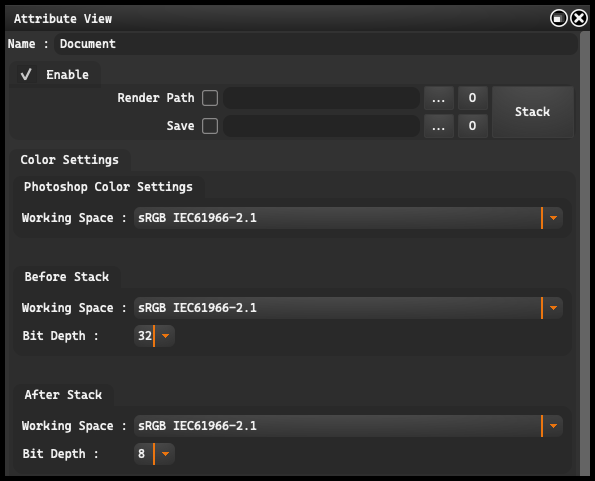
At the top of the interface, on the left-hand side, there is a feature called “Enable”.
With its help, we can easily turn on or off two key options: “Render Path” and “Save”.
-
Render Path: When the “Render Path” option is enabled, the selected rendering path will be used instead of the global rendering path of the project. This allows us to tailor the rendering path to specific needs. If you want to use the project’s global path but add additional subdirectories, you can use the global project tag PROJECT_RENDER_PATH_SOURCE.
-
Save: Similar to “Render Path”, the “Save” option allows you to specify a save path. When it’s enabled, the selected save path will be used instead of the project’s global save path. If you want to use the project’s global path but add additional subdirectories, you can use the global project tag PROJECT_COMP_PATH_DESTINATION.
-
Stack Button: On the right-hand side of the interface, there is a STACK button. After you have added the appropriate files or paths to the “Render Path” and “Save” options, you can press this button to apply the selected settings.
Color Settings This feature allows users to control color settings and bit depth both before and after performing operations on the stack. It provides the ability to choose from various color spaces.
-
Photoshop Color Settings: In this section, we have one selection field available - “working space”. It allows you to choose the color space in which you will be working. The options are: sRGB IEC61966-2.1, Adobe RGB, Adobe RGB (1998), ColorMatch RGB, Image P3, and ProPhoto RGB.
-
Before Stack: In the “Before Stack” section, we have the same list of color spaces to choose from as in the “Photoshop Color Settings” section, but additionally, we have the option to select “Bit Depth”. This option allows you to choose the bit depth of the image before performing operations on the stack. You can choose between 8, 16, or 32 bits.
-
After Stack: Similar to the “Before Stack” section, in “After Stack”, we have the choice of color space and bit depth. The chosen settings will affect the final result after performing operations on the stack.
-
Reload working spaces: When pressed, the color spaces will be reloaded from the plugin settings. This is useful if changes have been made to the plugin settings and you want them to be reflected in the current project.
ACES Conversion
The ACES (Academy Color Encoding System) is a color management standard designed to standardize color handling from all types of sources, providing a future-proof workspace for artists at every stage of the production process.
Regardless of the source of images, they are converted to the ACES color standard, which helps keep the entire team on the same page.
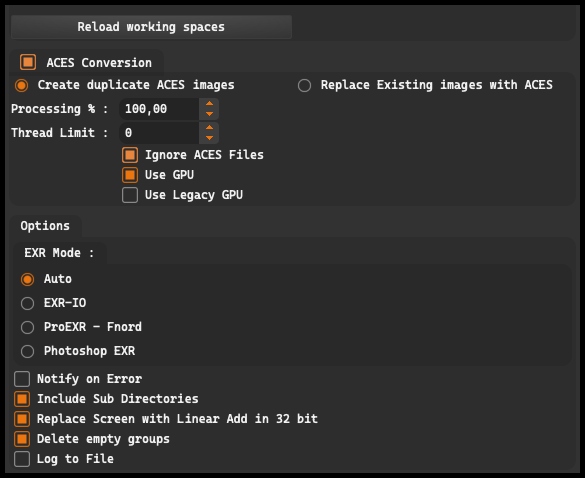
ACES Conversion can be activated or deactivated using the button next to the section name.
You can choose from two available options:
-
Create duplicate ACES image: this option will create a new image with the _ACES suffix, leaving the original image unchanged.
-
Replace Existing images with ACES: this option will replace existing renders with ACES images. Please note that if you run this operation multiple times, you’ll apply the ACES conversion as many times, which could potentially damage your renders.
-
Processing %: allows for control over the use of your hardware’s computational power during the ACES conversion. The input value determines the percentage of computational power to be used for image processing. This is especially important when dealing with a large number of high-resolution images that require intense computation.
It’s important to note that utilizing 100% of your hardware’s computational power could significantly burden the system. For example, if you have a 10-core processor and you use 100% of its computational power, you’ll likely have 3 threads per core, resulting in 20 concurrent image processing tasks. The required amount of RAM per image is about 1GB for a 10k x 10k image, so if you have limited RAM, it’s best to adjust the number of concurrent image processing tasks. The same principle applies to GPU usage. For instance, if you have a 24GB GPU, you can conduct up to 20 concurrent image processing tasks, assuming each image requires 1GB of memory and you leave 4GB free for the operating system.
-
Thread limit: allows you to specify the maximum number of threads to be used for image processing. You can input values from 0 (no limit) to 4. This is especially important in terms of performance and system resource management. The more threads are used, the faster the processing might be, but it can also lead to greater system load. Limiting the number of threads can be beneficial in situations where you want to minimize the impact of processing on other system activities.
-
Ignore ACES files: if this option is enabled, files with the _ACES suffix will be ignored. This option is available if you selected “Create duplicate ACES image”.
-
Use GPU: this option allows the GPU to be used for image processing. If this option is enabled, the resulting image will be 32-bit and will use a floating-point format. If the source was 16-bit, the resulting image will be twice as large.
-
Use Legacy GPU: this option functions similarly to “Use GPU”, but it disables other GPU utilization options.
EXR Mode is a feature that allows you to select how OpenEXR files are handled, a high dynamic range (HDR) graphic format popular in the visual effects industry. This provides users with the ability to tailor the process to the specific requirements of different platforms and applications, ensuring optimal compatibility and performance.
-
Auto: This is the recommended option for compatibility across different platforms. Icarus will automatically choose the best option, considering the operating system and other technical factors.
-
EXR-IO: This is the recommended option for Windows users. EXR-IO is an extension that aids in handling EXR files, providing enhanced support for this format on the Windows platform.
-
ProEXR: Fnord: This is the recommended option for MacOS users. ProEXR - Fnord is an extension that offers optimal support for EXR files on the MacOS platform.
-
Photoshop EXR: This option affects how well Icarus can stack layers. This is an optimal choice for those who want to leverage the full power of Photoshop in handling EXR files.
-
Notify on Error: This feature provides the user with immediate notification if an error occurs during processing. A message with the error information is displayed, allowing the user to quickly identify and solve the problem.
-
Include Sub Directories: This feature allows expanding the search area during rendering. When it is enabled, the software will also consider subdirectories, not only the root directory. This can be useful when the project structure includes various folders.
-
Replace Screen with Linear Add in 32 bit: Due to technical limitations, the blending mode is not available in a 32-bit environment. This option replaces the screen mode with linear addition, which allows for maintaining effect consistency in different environments.
-
Delete empty groups: This feature automatically deletes empty groups unless otherwise defined in the group settings. This helps in maintaining order and organization in the project structure.
-
Log to File: This feature creates a log file in the rendering folder. This file will contain the document’s name, date, and saved logs. It is an incredibly useful tool for tracking progress and diagnosing potential problems.