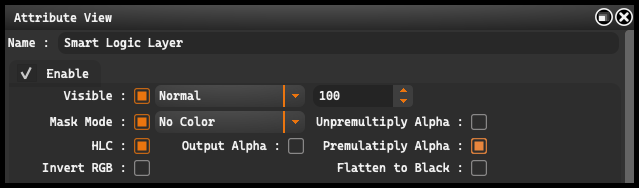
Smart Logic Layer provides the user with a range of options for layer customization. This feature allows for the creation of complex compositions with precise settings for each layer.
From the outset, the user has the ability to enable or disable the function using the “Enable” button.
-
Visible: allows for controlling the visibility of a Photoshop layer. Additionally, the user has a drop-down menu at their disposal with a wide selection of blending modes, from “Normal” to “Luminosity”, allowing for precise adjustment of layer interactions. Alongside this button is a field in which you can enter a value from 0 to 100, providing even more detailed control.
-
Mask Mode: enables mask generation. The user has the option to choose the mask color from the drop-down menu, offering another level of customization.
-
HLC: allows for applying compression to highlights, reducing the image to 16- or 8-bit depending on the settings. This is a useful tool for managing contrast and detail in high light saturation areas.
-
Invert RGB: allows for inverting RGB channels. This can be useful in various contexts, such as enhancing contrast or creating artistic effects.
-
Output Alpha: This option enables exporting of the alpha channel instead of RGB channels. This means that the saved image will contain transparency information, not colors. Enabling this option deactivates the next three options which are available when “Output Alpha” is disabled.
When “Output Alpha” is disabled, users have access to three additional options that allow precise control over how the alpha channel is processed:
-
Unpremultiply Alpha: This option enables the alpha channel to be unpremultiplied, which may lead to “rough” edges. This is useful when we want to later apply a clean alpha channel.
-
Premultiply Alpha: This option allows for the application of the alpha channel while simultaneously removing the black background. This operation can be particularly useful when we want to achieve clean edges. We can unpremultiply the alpha channel and then reapply it (premultiply) for a clean effect.
- Flatten to Black: This option becomes available when “Premultiply Alpha” is enabled. When activated, it creates a black layer below the layer with the applied alpha channel. The end result is the rendered image on a black background.
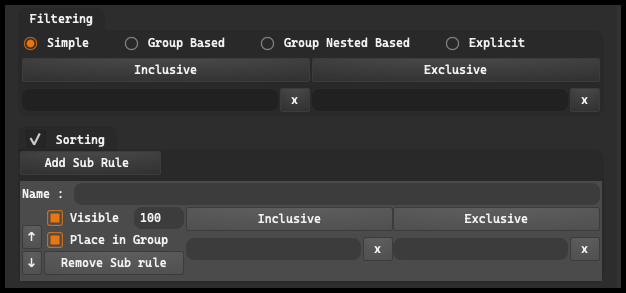
Filtering:
Simple#
This filter considers all images that meet ALL the criteria specified in the “Inclusive” tags and excludes images that meet any of the “Exclusive” tag criteria. There are two main fields here: “Inclusive” and “Exclusive”. By clicking on these fields, the user can add any number of rows and enter specific tags. These tags serve to precisely define which images are included (Inclusive) or excluded (Exclusive) from a given filter.
-
Sorting: After creating “Inclusive” and “Exclusive” filters, the user has the option to use the “Sorting” feature. In this window, you can add any number of subrules using the “Add Sub Rule” button. Each subrule contains a “Name” field, where the user can enter a name for a given subrule.
-
Visible: button, which decides whether the layer will be visible in Photoshop. Next to this button is a field where the user can enter a value from 0 to 999, thus determining the level of layer visibility.
Similar to the “Simple” filter, in the subrule, you can add “Inclusive” and “Exclusive” tags, which allow for precise control over which images are included or excluded from a given subrule.
-
Place in Group: button. If it is turned on, the contents of this filter will be placed in a new group, using the name given above. This allows for even greater organization and control over projects.
-
At the end of the subrule, there is a “Remove Sub Rule” button, which allows for the removal of the entire subrule if necessary.
Group Based#
Thanks to this filter, the user can easily group images based on defined criteria.
The filter takes into account images that meet all the tags specified in the “Inclusive” section while excluding those that match any tag from the “Exclusive” section. All matched images are then filtered through subrules, and after matching “Inclusive” tags and not matching “Exclusive” tags, images are accepted. Each element in the generated group list is then checked for common names, which are used to place it in the appropriate group.
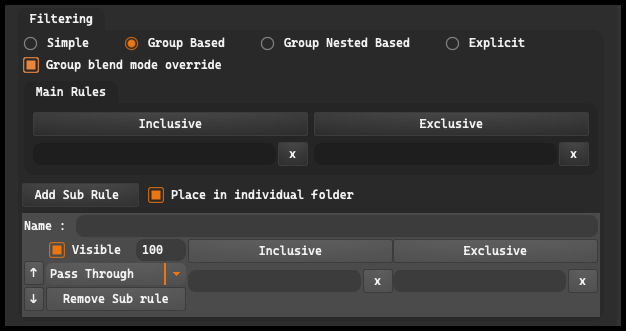
- Group blend mode override: option. If enabled, image groups use the “Pass Through” blend mode.
“Pass Through” is the default blend mode for layer groups in Adobe Photoshop. It allows the effects of layers within the group to pass through to layers below the group. In other words, if a layer group has the “Pass Through” blend mode set, all effects applied to layers in this group (for example, by overlaying colors, textures, light effects, etc.) will affect the layers located under the group. This means that the layers in the group can interact with the layers below as if they weren’t enclosed in a group. The “Group blend mode override” option allows forcing all groups to use this blend mode, regardless of individual layer settings within the group. This feature can be very useful when we want to ensure that the effects applied to images in a group will affect the rest of the project.
In the “Inclusive” and “Exclusive” sections, the user has the possibility to create any number of rows, where specific tags can be entered. This allows to precisely define which images are included or excluded from a given filter.
After defining the tags, the user has the option to add subrules using the “Add Sub Rule” button. In the subrule, a name can be entered,
-
Visible: Allows for controlling the visibility of layers in Adobe Photoshop, both for individual layers and groups of layers, including transparency. Next to this button is a field where you can enter a value from 0 to 999 to set the layer’s transparency degree, where 0 represents total transparency and 999 full visibility.
-
Place in individual folder: button, which allows placing matched images in individual folders.
Furthermore, a subrule in the “Group Based” filter contains a drop-down menu with blend mode options. The user can select a blend mode from a wide range of options, such as Pass Through, Normal, Dissolve, Darken, Multiply, Color Burn, and many others.
At the end of the subrule, there is a “Remove Sub Rule” button, which allows for the removal of the entire subrule if necessary.
Group Nested Based#
The filter allows the user to precisely manage image layers. Its key feature is the ability to create additional divisions of layers into various groups, significantly increasing the flexibility of layer organization.
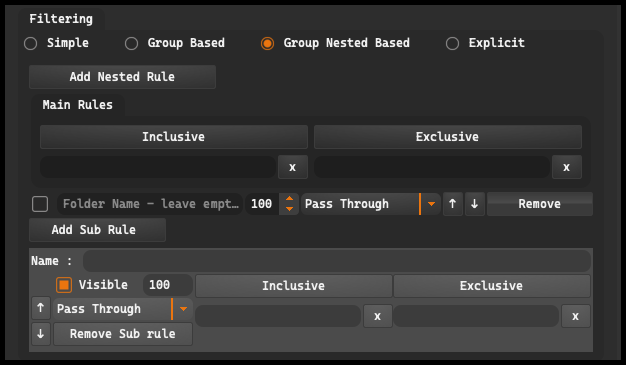
The user has a set of “Inclusive” and “Exclusive” rules at their disposal, which determine which images will be included or excluded based on specified tags.
Thanks to nested rules, the user can create more complex grouping structures, allowing for refined control over layer organization.
Upon clicking on “Add Nested Rule”, a window appears where a name can be entered for the nested rule.
- Visible: Allows for controlling the visibility of layers in Adobe Photoshop, both for individual layers and for entire groups of layers, while adjusting their transparency. Next to it is a field for entering values from 0 to 100, which allows for precise adjustment of the degree of transparency, where 0 means total transparency and 100 full visibility. Additionally, the user has a drop-down menu at their disposal with a wide selection of blending modes, from “Pass Through” to “Luminosity”, allowing for precise adjustment of layer interactions.
After defining tags, the user can add sub-rules using the “Add Sub Rule” button. In the sub-rule, a name can be entered, the layer’s visibility can be set (with a range of values from 0 to 999), and additional “Inclusive” and “Exclusive” tags can be added.
Furthermore, the sub-rule in the “Group Nested Based” filter includes a drop-down menu with blending mode options. The user can select a blending mode from a wide range of options such as Pass through, Normal, Dissolve, Darken, Multiply, Color Burn, and many others.
At the end of the subrule, there is a “Remove Sub Rule” button, which allows for the removal of the entire subrule if necessary.
Explicit#
The “Explicit” filter is a tool that allows for the direct loading of layers from selected files. This filter enables the user to control which layers are displayed, regardless of the document’s rendering path.
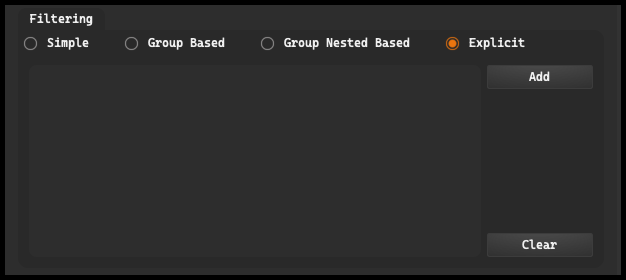
The “Explicit” filter operates by utilizing a list of layers provided by the user. The user has the ability to add layers by clicking the “Add” button, which allows for the addition of EXR files. Once added, all selected layers are displayed in the filter panel.
If the user wishes to remove any previously added layer, they can do so using the “Clear” button. This function allows for easy and fast clearing of the layer list, enabling the user to maintain order and clarity in their project.
Naming: is the place where users can add and customize naming rules for their files.
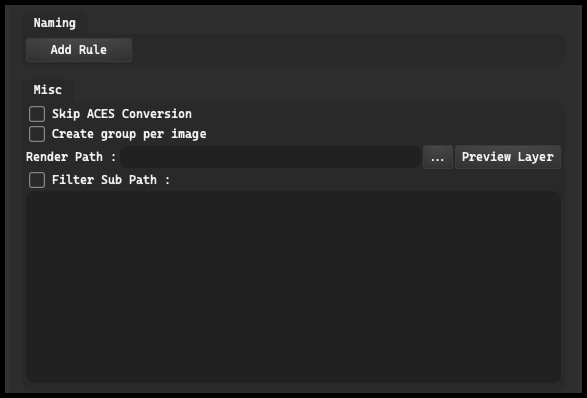
On this panel, there is an “Add Rule” button that, when clicked, opens up the opportunity to create custom file naming templates. These templates can be tailored to the individual needs of the user, for example, by including the creation date of the file in the name or by adding unique identifiers.
Misc: is a place where various additional settings and options are located that the user can tailor according to their needs.
-
Skip ACES Conversion: allows the user to skip ACES conversion. The option to skip ACES conversion can be useful if the user does not want to make changes to the image colors or if they are using a different color management system.
-
Create group per image: This option allows the user to create separate groups for each image.
-
Render path: This field allows the user to specify the render path. The user can designate a specific path on the disk where they want the resulting file to be saved.
-
Preview layer: allows the user to preview a selected layer. This is especially useful when working with multi-layered projects, allowing for quick and easy checks of the effects of specific layers.
-
Filter Sub Path: This option allows for filtering and searching for specific subpaths within the project file structure. This can be useful when the user wants to quickly locate and focus on a specific segment of the project.
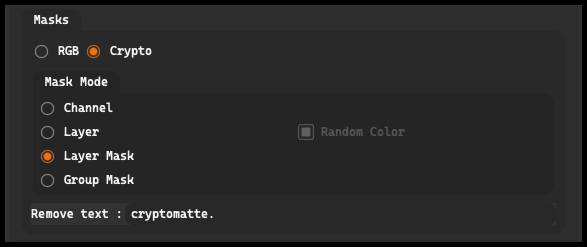
Masks: tab offers advanced options for managing and manipulating layer masks. Selecting Mask Mode at the top of the window activates the user interface for this tab.
It is divided into two sections that can be selected using the RGB or Crypto buttons at the top. Each of these sections has its specific settings, but both contain a common element called Mask Mode.
Mask Mode allows you to choose the type of mask you want to create - you can choose between Channel, Layer, Layer Mask, and Group Mask.
Choosing Layer activates the “Random Color” button on the right side, which allows for random color assignment to different layers for better differentiation.
The “Crypto” section additionally contains a text field for entering “cryptomatte” information.
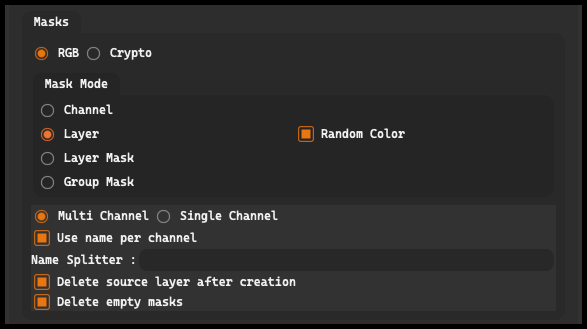
In the “RGB” section, we have at our disposal the “Multi Channel” and “Single Channel” buttons.
-
Multi Channel: allows for simultaneous manipulation of multiple channels.
-
Single Channel: limits operations to one channel.
-
Use name per Channel: allows for individually naming each of the channels, and the “Name Splitter” field is for entering a separator for these names.
-
Delete source layer after creation: which removes the original layer after mask creation.
-
Delete empty masks: which removes empty masks that contain no data.