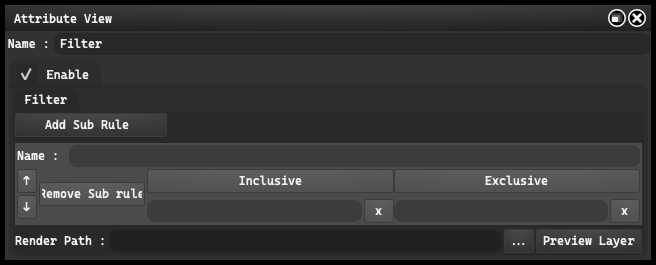
Filter#
The “Filter” feature allows users to apply filters to groups of layers, enabling precise control over which layers are displayed.
Users can define various rules and criteria that layers must meet to be included.
-
Enable: When activated, the filter is active and applies the user-defined rules to the group of layers. When deactivated, the filter is inactive, and none of the defined rules are applied.
-
Add Sub Rule: Upon clicking, a new window appears where users can define additional rules for the filter. An unlimited number of these “sub-rules” can be added, providing users with considerable flexibility in defining which layers are filtered.
Each sub-rule has a “Name” field where the rule’s name can be entered. This is useful for organization, especially when defining multiple rules.
- Inclusive" and “Exclusive: By clicking on these names, users can define whether the sub-rule is “Inclusive” or “Exclusive”. “Inclusive” means that layers meeting the sub-rule’s criteria will be included. “Exclusive” means that layers meeting the sub-rule’s criteria will be excluded. Users can add additional rows of criteria for the sub-rule. Each row represents different criteria that a layer must meet to be included or excluded.
At the end of the subrule, there is a “Remove Sub Rule” button, which allows for the removal of the entire subrule if necessary.
-
Render path: This field allows the user to specify the render path. The user can designate a specific path on the disk where they want the resulting file to be saved.
-
Preview layer: allows the user to preview a selected layer. This is especially useful when working with multi-layered projects, allowing for quick and easy checks of the effects of specific layers.
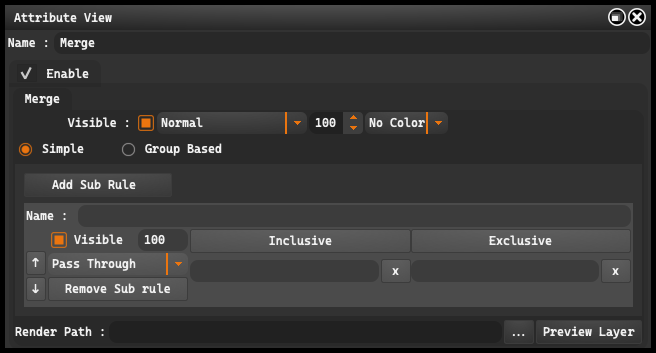
Merge#
Merge is used to combine multiple image layers into one, while preserving the ability to edit each of them.
-
Enable: This option allows you to enable and disable the grouping function. This can be useful when you want to temporarily disable the effects of a group to see how it impacts the overall project.
-
Visible: Allows for controlling the visibility of layers in Adobe Photoshop, both for individual layers and for entire groups of layers, while adjusting their transparency. Next to it is a field for entering values from 0 to 100, which allows for precise adjustment of the degree of transparency, where 0 means total transparency and 100 full visibility.
The drop-down menu with checkboxes allows you to choose different blending modes for the group. Blend modes determine how the layers in the group will interact with the layers below. Options include modes such as “Normal”, “Multiply”, “Overlay”, etc. Each has a unique effect on how the colors and brightness of the layers are combined.
At the end of the line, there is a menu that allows you to choose a color label for the group. Color labels are often used for organization and quick identification of groups or layers in a complex project. Options include “No Color”, “Red”, “Orange”, “Yellow”, and others.
Key filters - “Simple” and “Group Based” - enable users to optimize data processing workflows by merging different data sets into a unified whole. The “Simple” filter allows users to filter data based on specified criteria, while the “Group Based” filter offers data grouping based on defined categories.
After defining the tags, the user has the option to add subrules using the “Add Sub Rule” button. In the subrule, a name can be entered,
- Visible: Allows for controlling the visibility of layers in Adobe Photoshop, both for individual layers and groups of layers, including transparency. Next to this button is a field where you can enter a value from 0 to 999 to set the layer’s transparency degree, where 0 represents total transparency and 999 full visibility.
Furthermore, a subrule in the “Merge” filter contains a drop-down menu with blend mode options. The user can select a blend mode from a wide range of options, such as Pass Through, Normal, Dissolve, Darken, Multiply, Color Burn, and many others.
At the end of the subrule, there is a “Remove Sub Rule” button, which allows for the removal of the entire subrule if necessary.
-
Render path: This field allows the user to specify the render path. The user can designate a specific path on the disk where they want the resulting file to be saved.
-
Preview layer: allows the user to preview a selected layer. This is especially useful when working with multi-layered projects, allowing for quick and easy checks of the effects of specific layers.
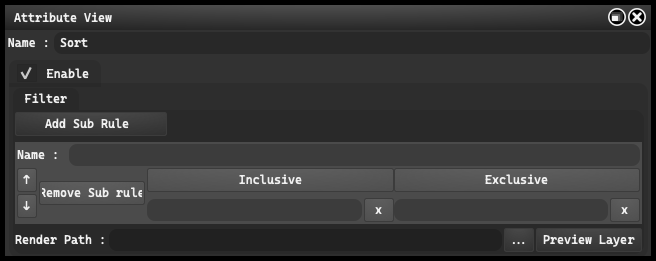
Sort#
Sort is a function that allows arranging items according to a specific criterion.
-
Enable: When activated, the filter is active and applies the user-defined rules to the group of layers. When deactivated, the filter is inactive, and none of the defined rules are applied.
-
Add Sub Rule: Upon clicking, a new window appears where users can define additional rules for the filter. An unlimited number of these “sub-rules” can be added, providing users with considerable flexibility in defining which layers are filtered.
Each sub-rule has a “Name” field where the rule’s name can be entered. This is useful for organization, especially when defining multiple rules.
- Inclusive” and “Exclusive: By clicking on these names, users can define whether the sub-rule is “Inclusive” or “Exclusive”. “Inclusive” means that layers meeting the sub-rule’s criteria will be included. “Exclusive” means that layers meeting the sub-rule’s criteria will be excluded. Users can add additional rows of criteria for the sub-rule. Each row represents different criteria that a layer must meet to be included or excluded.
At the end of the subrule, there is a “Remove Sub Rule” button, which allows for the removal of the entire subrule if necessary.
-
Render path: This field allows the user to specify the render path. The user can designate a specific path on the disk where they want the resulting file to be saved.
-
Preview layer: allows the user to preview a selected layer. This is especially useful when working with multi-layered projects, allowing for quick and easy checks of the effects of specific layers.
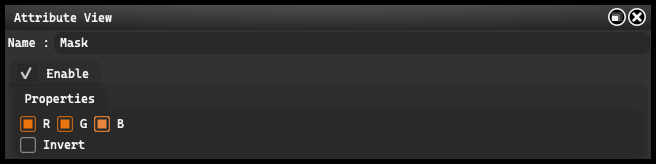
Mask#
Mask is a feature that allows for selective hiding and revealing areas of an image.
-
Enable: This button allows you to enable or disable the mask. When the mask is enabled, the user can control which elements of the image are visible and which are hidden.
-
R, G, B: These buttons represent the three basic colors. Users can use these buttons to apply the mask to specific color channels in the image, allowing for very precise manipulations.
-
Invert: This button inverts the mask. If an area was previously visible, it will become invisible after pressing “Invert”. This is particularly useful when the user wants to work on areas of the image that were previously hidden.